


Fine tune your own Siri
Lesson 3: When boring becomes essential


🚨 Alert. This article is dangerously practical; no AI buzzword bingo here. Oh, and did I mention? We have CODE. 🧑💻
Oh, and one more thing… we’re now on 🔗 LinkedIn! Follow for snippets of knowledge.

Recap
“Build Your Own Siri” is back, this time diving into the most exciting part yet: fine‑tuning the model.
Even though it’s been a while since our last lesson, we’ve got tons to cover. And before we jump in, let’s have a quick recap of what we did last time.
In our last lesson, we used Salesforce’s xlam-function-calling-60k dataset as a few-shot prompt to generate our own function-tooling dataset.
Here’s what we did:
Generated fresh examples based on the original structure: query, available tools, and answers;
Paraphrased instructions to have a more human like response;
Took out all the unnecessary data, keeping only examples that enhanced training quality;
Injected human-like grounding by referencing patterns from real-world assistant datasets;
Formatted everything using ShareGPT-style dialogs.
With a solid and realistic dataset in place, we’re finally ready to fine-tune our model.
Let’s jump into the most exciting part!
This is a 4-part course.
Don’t forget to read the other lessons of this course:


Table of contents
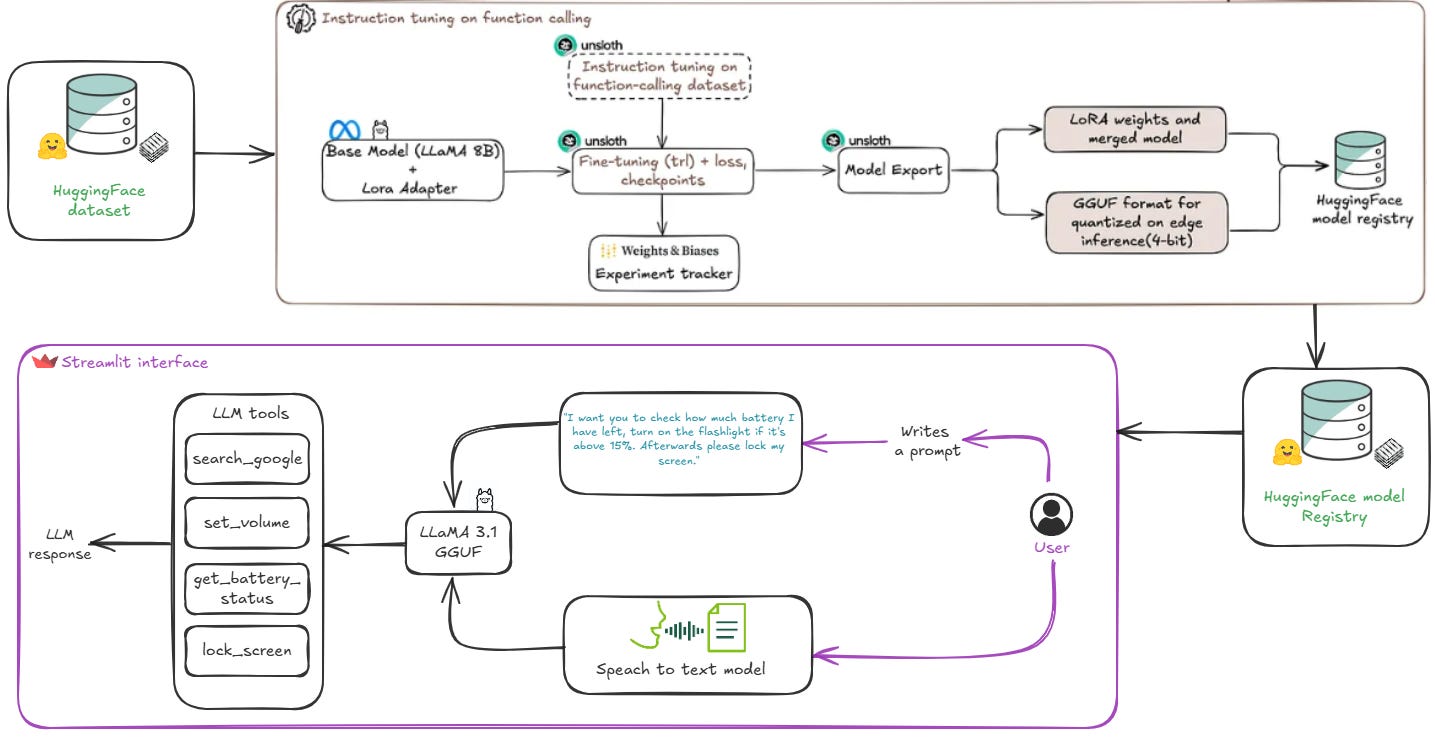
Fine-Tuning Architecture Overview
Model Selection and Fine-Tuning Strategy
Model Quantization and Deployment
Inference Testing with Streamlit
1. Fine-Tuning Architecture Overview
Fine-tuning doesn’t start with code. It starts with intent and the definition of what problem the AI system solves.
Fine-tuning is a tedious process that requires patience (and I know you would like to see results within a few minutes). However, this is not actually possible here, even though I do have an ace up my sleeve: Unsloth.
In order to have a good model that does what it's supposed to do, we need to provide it with good, reliable and consistent information. For this, we will use the dataset generated by us in the last lesson and use it to train our model.
I’ve prepared a clear, step-by-step workflow that outlines exactly what needs to be done and how to approach it.
Even though we are coming back to the dataset, we need to understand that this is the most important part of fine-tuning your model.
Think of it like this: if you have a model that was originally trained to recognize animals, but now you want it to recognize cars, continuing with that same model won’t work effectively — even if you change the dataset.
The knowledge embedded in the model is tailored to animals, not vehicles, and it may struggle to adapt. That’s why choosing the right starting model — one that’s already been trained on data similar to yours — is just as important as preparing the right dataset.
That’s why we need to identify a base model that’s already been trained on a dataset similar to ours — something that aligns with our objectives and is well-suited for edge deployment.
2. Model Selection and Fine-Tuning Strategy
For this research, I identified two models that meet the outlined requirements: LLaMA 3.1 8B Instruct and Gemma 2 2B.
Both models support function-calling tasks and are instruction-tuned, which is essential for building a reliable assistant that can interpret and respond to structured prompts consistently.
They are both small language models (SLMs), making them suitable for deployment on edge devices. An additional selection criterion was compatibility with Unsloth, which allows for efficient fine-tuning on limited hardware.
To determine the best model, we fine-tuned and tested both models on a different dataset that we generated. We counted the number of valid and invalid data generated, and also checked whether the generated sample corresponded to the expected one.
But before we jump into the comparison, let's dive into the fine-tuning strategy.
Fine-Tuning Strategy
We start with a base model (LLaMA 3.1 8B or Gemma 2 2B) and attach LoRA adapters for efficient parameter tuning.
import torch
from unsloth import FastLanguageModel

max_seq_length = 2048     # Unsloth auto supports RoPE Scaling internally!
dtype = None              # None for auto detection
load_in_4bit = True      # Use 4bit quantization to reduce memory usage. Can be False.

model, tokenizer = FastLanguageModel.from_pretrained(
    model_name = "unsloth/Meta-Llama-3.1-8B-Instruct", #(or "unsloth/gemma-2b-it")
    max_seq_length = max_seq_length,
    dtype = dtype,
    load_in_4bit = load_in_4bit,
)

model = FastLanguageModel.get_peft_model(
    model,
    r=16,   # LoRA rank - suggested values: 8, 16, 32, 64, 128
    target_modules=["q_proj", "k_proj", "v_proj", "o_proj",
                    "gate_proj", "up_proj", "down_proj"],
    lora_alpha=16,
    lora_dropout=0,   # Supports any, but = 0 is optimized
    bias="none",      # Supports any, but = "none" is optimized
    use_gradient_checkpointing="unsloth",  # Ideal for long context tuning
    random_state=3407,
    use_rslora=False,   # Disable rank-sensitive LoRA for simpler tasks
    loftq_config=None   # No LoftQ, for standard fine-tuning
)
Afterwards, we adapted the dataset to match the chat template format required by our chosen model, ensuring that the prompts and responses aligned with the model’s expected input structure. This step is crucial for enabling the model to correctly interpret the instruction and produce valid function-call outputs.
from unsloth.chat_templates import get_chat_template

# Initialize the tokenizer with the chat template and mapping
tokenizer = get_chat_template(
    tokenizer,
    chat_template = "llama-3", #(or "gemma")
    mapping = {"role" : "from", "content" : "value", "user" : "human", "assistant" : "gpt"}, # ShareGPT style
    map_eos_token = True,        # Maps <|im_end|> to <|eot_id|> instead
)

def formatting_prompts_func(examples):
    convos = []

    # Iterate through each item in the batch
    for query, tools, answers in zip(examples['query'], examples['tools'], examples['answers']):
        tool_user = {
            "content": f"You are a helpful assistant with access to the following tools or function calls. Your task is to produce a sequence of tools or function calls necessary to generate response to the user utterance. Use the following tools or function calls as required:\n{tools}",
            "role": "system"
        }
        ques_user = {
            "content": f"{query}",
            "role": "user"
        }
        assistant = {
            "content": f"{answers}",
            "role": "assistant"
        }
        convos.append([tool_user, ques_user, assistant])

    texts = [tokenizer.apply_chat_template(convo, tokenize=False, add_generation_prompt=False) for convo in convos]
    return {"text": texts}


# Apply the formatting on dataset
dataset = dataset.map(formatting_prompts_func, batched = True,)
We now begin the fine-tuning process, training our model for three epochs. To manage this, we defined a custom training setup using Hugging Face’s TrainingArguments, which controls the key aspects of the training loop such as learning rate, batch size, precision settings, and logging frequency. Additionally, we’ve integrated Weights & Biases for real-time experiment tracking, enabling us to monitor the training progress and evaluate performance throughout the entire fine-tuning session.
from transformers import TrainingArguments

args = TrainingArguments(
        per_device_train_batch_size = 8,  # Controls the batch size per device
        gradient_accumulation_steps = 2,  # Accumulates gradients to simulate a larger batch
        warmup_steps = 5,
        learning_rate = 2e-4,             # Sets the learning rate for optimization
        num_train_epochs = 3,
        fp16 = not torch.cuda.is_bf16_supported(),
        bf16 = torch.cuda.is_bf16_supported(),
        optim = "adamw_8bit",
        weight_decay = 0.01,              # Regularization term for preventing overfitting
        lr_scheduler_type = "linear",     # Chooses a linear learning rate decay
        seed = 3407,
        output_dir = "outputs",
        report_to = "wandb",              # Enables Weights & Biases (W&B) logging
        logging_steps = 1,                # Sets frequency of logging to W&B
        logging_strategy = "steps",       # Logs metrics at each specified step
        save_strategy = "no",
        load_best_model_at_end = True,    # Loads the best model at the end
        save_only_model = False           # Saves entire model, not only weights
    )
And now that we have all the needed elements, we can start fine-tuning our model. This part is pretty straightforward, thanks to Unsloth.
We chose Unsloth because it’s designed specifically for fast and memory-efficient fine-tuning of instruction-tuned models. Compared to traditional Hugging Face approaches, Unsloth offers:
2–5× faster training for shorter sequences
Reduced memory usage with 8-bit optimizers
Built-in LoRA and quantization support
Streamlined setup, working seamlessly with
trl.SFTTrainer
This means we can achieve high-quality fine-tuning in significantly less time, making it ideal for rapid development — and of course, perfect for engineers who want to skip the long, tedious “training” phase and get straight to results.
from trl import SFTTrainer

trainer = SFTTrainer(
    model = model,
    processing_class = tokenizer,
    train_dataset = dataset,
    dataset_text_field = "text",
    max_seq_length = max_seq_length,
    dataset_num_proc = 2,
    packing = False,        # Can make training 5x faster for short sequences.
    args = args
)

from unsloth import unsloth_train

trainer_stats = unsloth_train(trainer)
print(trainer_stats)
And now we push our model to Hugging Face to preserve a versioned checkpoint and make it accessible for future use. We also stop the Weights & Biases tracking to wrap up the fine-tuning session cleanly.
wandb.finish()

model.push_to_hub("YourUser/YourModel", token = hf_token)
tokenizer.push_to_hub("YourUser/YourTokenzier", token = hf_token)
Model Selection
Now that both models are fine-tuned, it's time for model selection. To determine which one performs better in function-calling scenarios, we run a structured evaluation against our dataset.
Each model is prompted with queries and a list of available tools, and it must generate function calls strictly in JSON format.
We check performance using a function that validates the following:
The output is written in a correct JSON format
The structure matches our expectations
The function names and arguments match the expected ones
Using this function allows us to determine which model best meets our needs.
import json
from tqdm import tqdm
import re

def extract_json_arrays(text):
    # Find all JSON array-like blocks
    array_pattern = r"\[\s*{.*?}\s*]"  # non-greedy match
    matches = re.findall(array_pattern, text, re.DOTALL)

    # Convert each match into an actual list
    parsed = []
    for match in matches:
        try:
            parsed.extend(json.loads(match))
        except json.JSONDecodeError as e:
            print("Error decoding:", match, e)
    return parsed

dataset = load_dataset("valex95/siri-function-calling", split="train", token=hf_token)

def evaluate_model_on_dataset(dataset, model, tokenizer, max_samples=10):
    total = 0
    correct_calls = 0
    valid_json = 0
    wrong_structure = 0

    results = []

    for example in tqdm(dataset.select(range(min(max_samples, len(dataset))))):
        query = example["query"]
        expected_calls = example["answers"] if isinstance(example["answers"], list) else json.loads(example["answers"])
        tools = example["tools"] if isinstance(example["tools"], list) else json.loads(example["tools"])

        # Prompt model with tools
        chat = [
            {"role": "system", "content": (
                "You are a function-calling assistant that only replies with JSON.\n"
                f"Available functions:\n{json.dumps(tools, indent=2)}"
            )},
            {"role": "user", "content": query}
        ]

        # Generate model response
        inputs = tokenizer.apply_chat_template(chat, tokenize=True, add_generation_prompt=True, return_tensors="pt").to(model.device)
        output = model.generate(inputs, max_new_tokens=512)

        try:
            response = tokenizer.batch_decode(output)[0]
            generated_calls = extract_json_arrays(response)
            valid_json += 1
        except Exception:
            generated_calls = []
            wrong_structure += 1

        # Compare only first function call (for now)
        expected = expected_calls[0] if expected_calls else None
        generated = generated_calls[1] if generated_calls else None

        match = (
            [generated.get("name") if generated is not None else 0] == [expected.get("name") if expected is not None else 0]
            and [generated.get("arguments") if generated is not None else 0] == [expected.get("arguments") if expected is not None else 0]
        )

        if match:
            correct_calls += 1

        total += 1
        results.append({
            "query": query,
            "expected": expected,
            "generated": generated,
            "match": match
        })

    # Print summary
    print("\n📊 Evaluation Summary:")
    print(f"Total Samples Evaluated: {total}")
    print(f"✅ Correct Function Calls: {correct_calls} ({correct_calls/total:.2%})")
    print(f"🧠 Valid JSON Outputs: {valid_json} ({valid_json/total:.2%})")
    print(f"❌ Invalid JSON/Structure: {wrong_structure} ({wrong_structure/total:.2%})")

    return results

results = evaluate_model_on_dataset(dataset, model, tokenizer)
For this evaluation, we used a custom dataset consisting of approximately 900 samples.
The results were as follows:
Gemma 2 achieved around 70% JSON validity and 70% correct function calls.
LLaMA 3.1, on the other hand, delivered a perfect score, with 100% valid JSON and 100% accurate function calls.
These results clearly indicate that LLaMA 3.1 is better suited for our specific function-calling use case.
3. Model Quantization and Deployment
Now that we’ve selected the best-performing model for our Siri-like application, the next step is to quantize it.
Quantization significantly reduces the size of the model and its memory footprint while maintaining performance, making it a good fit for an edge deployment.
To achieve this, we use Ollama, a tool that simplifies the packaging and deployment of quantized models. You can install it with the following command:
curl -fsSL https://ollama.com/install.sh | shAfter installing Ollama and quantizing our model, we upload it to the Hugging Face Hub in GGUF format, which is optimized for on-device execution.
The following command uploads multiple quantized versions of the model (q4_k_m, q5_k_m and q8_0), providing a varied selection ranging from 4-bit to 8-bit quantization.
This helps us choose the most suitable model for our needs, as some edge devices may be compatible with an 8-bit model:
model.push_to_hub_gguf(
 repo_id="YourUser/YourOllama",
 tokenizer=tokenizer,
 quantization_method=["q4_k_m", "q5_k_m", "q8_0"],
 token=hf_token )
This step involves pushing our quantized versions of the model onto Hugging Face, which means that we can now use them in the Streamlit application and see how they will do.
4. Inference Testing with Streamlit
Now, let's test our fine-tuned and quantized model using a Streamlit interface to evaluate its behavior in a real-time setting and observe how it handles function-calling prompts from users (STT or just a simple prompt)
The complete code for this Streamlit interface will be available on GitHub for anyone interested in running or extending the project. All the fine-tuned and quantized models used throughout this research can be found on HuggingFace.
Wrapping Up
If you’ve followed this far (drop a 🔥 in the comments, it’s been a journey), you've gone through the complete process of building and fine-tuning a lightweight, function-calling assistant from scratch. By this point, you should have:
A solid understanding and modular workflow for fine-tuning models efficiently with Unsloth;
An evaluation pipeline that validates performance through JSON structure and function call accuracy;
A quantized version of the model, optimized for edge deployment;
A Streamlit interface to easily test and interact with the assistant in real-time.
Coming Up Next: Deployment on the edge
In the following article, we’ll discuss about how to deploy your model on the edge.
We’ll show you how to:
Build and run the application locally
Integrate the model for on-device (edge) deployment
Test your own Siri-like assistant in action
It’ll be hands-on.
It’ll include real code, real configs, and real gotchas.
And this is the moment your assistant becomes what you built it to be—a true Siri-like companion, responding intelligently and effortlessly.
🔗 Check out the code on GitHub and support us with a ⭐️